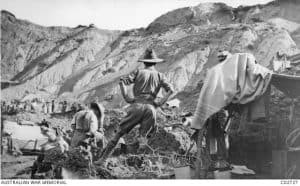
This article is based on the virtually unknown Battle of Dead Man’s Ridge which took place at Gallipoli on 7th August 1915. On that morning the 1st Light Horse Regiment attacked the Turkish trenches opposite Pope’s Post. At the same time the 8th and 10th Light Horse Regiments attacked the Turkish trenches across level ground now know as The Nek. The Nek has gone down as one of the great Australian military tragedies with the attackers slaughtered before they could get more than a few yards from their trenches. The attack by the Light Horse at The Nek formed the storyline of the great Australian movie “Gallipoli” starring a young Mel Gibson. What seems to be little known though, is that at Dead Man’s Ridge the 1st Light Horse suffered a greater proportion of casualties than those regiments which charged at The Nek.
The 1st Light Horse Regiment was formed at Roseberry Park, Sydney in August 1914. It was formed from men who had served in the Light Horse militia regiments, augmented by men from the country districts who could demonstrate a high standard of riding. Most of the men had prior experience in either the 6th, 7th, or 11th Light Horse militia regiments.
Among the recruits were Troopers William Patrick Eurell, a 22 year old motor driver of Tumut, and George Gladstone McDonald, a 25 year old store assistant of Crookwell. Both had prior military experience with the 11th Light Horse (Militia) Regiment. Bill Eurell was born at Tumut on 23rd May 1892, the son of William Eurell and Johanna Hassett. George McDonald was born at Crookwell in 1889, the son of George McDonald.
Bill Eurell joined up with a mate (who was also possible a relative, Patrick Joseph Lenehan, a 25 year old labourer of Tumut. George McDonald joined up with two mates – George Hills, a 26 year old labourer of Crookwell, and James Wilfred (Wilf) Kenny, a 26 year old grocer of Crookwell. All five of them were assigned to ‘B’ Squadron.
Lt-Col J B Meredith, of the 6th Light Horse militia, was appointed to be the first commander of the 1st Light Horse Regiment on 28th August 1914. At that time the regiment was nearly fully manned but there was a general shortage of equipment, particularly in stirrups and saddlery.
Training and field firing continued for the next couple of months and commanding officers of squadrons were appointed: ‘A’ Squadron – Major J M Reid, ‘B’ Squadron – Major Thomas Edward William Waddell Irwin of the 11th Light Horse, native of Bega, NSW, ‘C’ Squadron – Major C H Granville.
On 19th October 1914 the Regiment, numbering 24 officers, 484 men and 461 horses embarked on the troopship ‘Star of Victoria’. The vessel joined the first convoy to leave Australia and proceeded to Egypt via Albany, Ceylon and the Suez Canal. The vessel left Sydney on 20th October and reached King George’s Sound (Albany) WA on 26th October.
On 1st November the convoy, which now included several New Zealand troopships, departed for Aden under naval escort. Off the Cocos-Keeling Islands, HMAS Sydney destroyed the German raider “Emden” after a short gun-battle. The convoy crossed the equator on 12th November and several of the Regiment’s horses were lost to pneumonia during the passage of the Red Sea. The ‘Star of Victoria’ reached the Suez Canal on 1st December and the Regiment was disembarked at Alexandria on 8th December. It was then moved by rail to Cairo and the men marched the 10 miles to Maadi where camp was made. Training continued for the next few months with the men escaping to Cairo whenever possible.
On 25th April 1915 the infantry battalions of the 1st AIF Division landed at Anzac Cove at Gallipoli and suffered a large number of casualties from enemy action. The infantry dug in and trench warfare ensued. Casualties continued to mount but disease soon outstripped wounds as the major cause of the battalion’s losses. As a result volunteers were sought from the Light Horse regiments to fight as dismounted troops at Anzac. The Light Horse regiments volunteered almost to a man and by early May 1915 they were on their way to Gallipoli.
The 1st Light Horse Regiment received orders on 6th May to proceed to Gallipoli. The Regiment embarked on the 9th May – 25 officers and 447 men on board the troopship ‘Devonha’, and 1 officer and 30 men on board the ‘Kingstonia’. The Regiment was landed 2,000 yards south of the Fisherman’s Hut at Anzac Cove at 6.00 am on 12th May. For the next three days the Regiment was in reserve and familiarising itself with the trenches. During this period it suffered its first fatality and 8 men were wounded.
On 15th May the Regiment took over the trenches at Pope’s Post. At 3.50 am on 19th May the Turks attacked in huge numbers across the whole line. At least 100 reached as far as the 1st Light Horse Regiment’s trenches and fierce hand fighting took place. Eleven men were killed and 2 officers and 15 men were wounded during this fight. The Turks suffered over 5,000 casualties that night. For the next week the Regiment underwent continuous sniping and by 26th May it had suffered a total of 71 casualties since landing at Gallipoli. The Turks made another minor attack on 29th May and the Regiment had another 2 men killed and 15 wounded.
In early August a series of attacks were planned by the Australians at Anzac to draw enemy units away from a proposed landing by British units at Suvla Bay. The infantry were to take the Turkish stronghold at Lone Pine, the 3rd Light Horse Brigade (8th and 10th Light Horse Regiments) were to attack at the Nek, and the 1st Light Horse Regiment was to attack the Turkish trenches opposite Pope’s. It was hoped that the British attack would cut the peninsula in two, cutting off large numbers of the defending Turks.
At 4.30 am on 7th August 1915 the Regiment was ordered to attack the Turkish ‘Chessboard’ trenches north of Bloody Angle in cooperation with units at Walker’s Post (the Nek) on the left and Quinn’s Post on the right. The principle objective of the attack was a hill known as Baby 700, which overlooked the Lone Pine trenches.
The attack by the 1st Light Horse was to be directed by Major T W Glasgow, commandant of Pope’s Post, and was to be made by two of its squadrons comprising 200 men. Instructions were to go over the top when the 8th Light Horse left their trenches on the left to charge across the Nek. Orders were issued that rifles were to remain unloaded during the charge and that no shots were to be fired without authority from an officer. Bayonets were to be fixed and rifles were not to be loaded until the enemy trenches were occupied.
The Regiment’s history says that Major Reid, a grazier of Tenterfield NSW, lost his life as he gallantly led the attack. The storming party reached as far as the third line of the enemy’s trenches at ‘Chessboard’ and held them for 2 hours. The enemy counterattacked in great strength and the attackers soon ran out of bombs. The Turks were then able to bomb the already thinned out regiment back to its own lines.
The Regimental diary provides a brief description of the attack:
“August 7, 1915, Pope’s Post – General attack by our forces along the whole line. Our attack was made at 04:30 from Pope’s Hill on the Chessboard trenches N(orth) of Bloody Angle. The attack was gallantly led by Major J M Reid. The storming party reached the third line of trenches, occupied about 30 yards of them and held them for 2 hours but the enemy counter attacked in great force. They severely bombed the forward party and forced them to retire. Lt G.H.L.Harris, displayed great gallantry in leading 1st line of storming party and although wounded remained in the foremost position gained until retirement. 566 Cpl Keys, T J, 437 Pte Tancred, R C, 397 Pte Barrow, F displayed great bravery in carrying bombs to the storming party over ground swept by machine gun and rifle fire.”
The Regimental diary also says that the Regiment lost 15 men killed, 98 wounded, and 35 missing as a result of the attack. A Court of Inquiry later found that the missing men were assumed to have been killed in action. Many of the wounded also died before they could reach hospital in Egypt. A search of the War Memorial Honour Roll shows that 60 men were killed in action on the day of the attack and a further 4 died of wounds on the following two days.
On the same day that the 1st Regiment attacked at Dead Man’s Ridge, the 8th and 10th Light Horse Regiments attacked at The Nek and suffered huge casualties. However the 1st Regiment suffered a greater proportion of casualties amongst its attacking forces – 148 out of 200, or nearly 75%. The casualties included all of the officers and many of the men of ‘B’ Squadron.
On the following day the Regiment was back in action giving heavy covering fire to the infantry who successfully attacked the Turkish fortified trenches at Lone Pine. By 14th August the Regiment had been reduced to only 166 men. ‘B’ Squadron had lost so heavily that a squadron from the 12th Light Horse was transferred to become the new ‘B’ squadron of the 1st Light Horse until further reinforcements could be obtained from Egypt.
The Sydney Morning Herald edition of 27th August 1915 included a description of the Lone Pine Battles, which included The Nek and Dead Man’s Ridge, as reported by the Australian war correspondent Captain C E W Bean:
“LONE PINE
GREAT CHARGE BY LIGHT HORSEMEN
Gaba Tepe 1915
The long battle for Lone Pine . . . appears definitely to have come to an end . . . . The trenches are now solidly ours. Their capture by the First Brigade (Infantry) and the defence by the same troops, who retained their dash and cheerfulness to the last, are a feat as fine as any accomplished in this war.
Another feat which deserves never to be forgotten, though probably less will be heard of it, was the attempt of the First and Third Light Horse Brigades to capture the trenches opposite them. The attack on Lone Pine had already forced the Turks to rush two brigades of reserves to the south end of the line, and it was now necessary to prevent them moving troops from the centre. For this purpose, the two Light Horse brigades were ordered to charge from the angle of our line the immensely strong position held by the Turks opposite them. The Turkish lines here consist of trench after trench for sometimes eight deep across gradually rising ground. The Third Light Horse Brigade was attacking the narrow neck of the ridge, only 100 yards broad, across which trenches faced each other at 50 yards distance.
Further to the right the First Light Horse Brigade made an equally gallant and desperate attack. The second regiment was to charge from Quinn’s. The attacking party was organised in lines of 50 men. The First Light Horse Regiment issued from both flanks of its position at the head of the valley, between the other two attacks, under a heavy fire. They managed to take three trenches. Eventually it became clear that if the men remained much longer all must be killed. The attacking party, therefore, was withdrawn . . . . We retained none of the trenches attacked in this fight, but for sheer self-sacrifice and heroism this charge of the Australian Light Horse is unsurpassed in history.”
Both Bill Eurell and George McDonald survived the Battle of Dead Man’s Ridge without physical hurt. Eventually they were evacuated to Egypt with the rest of the Regiment in December 1915 when the Gallipoli campaign was abandoned. The 1st Light Horse Regiment participated in most of the great battles of the Desert campaign – Romani in 1916, Gaza and Beersheba in 1917.
Bill Eurell fought with the Regiment in the Sinai desert but he later transferred to the Australian Flying Corps (AFC), serving in Egypt and then on the Western Front. George McDonald rose to the rank of Sergeant in the 1st Light Horse as he fought his way across the desert into Palestine and Syria. George McDonald returned home in 1919 and Bill Eurell returned home in 1920 after marrying in England.
There was another link between Bill Eurell and George McDonald. Bill Eurell served with AFC headquarters in Tetbury, Gloucestershire in 1917 and 1918. At the end of the war he took leave and worked for a local butcher, one Richard Tranter. George McDonald married Vida Tranter of Bigga some time after he returned to Australia. Vida’s ancestors came from around Tetbury before they migrated to Australia in 1839. Bill Eurell was my father’s cousin, whilst as mentioned, George McDonald married Vida Tranter, my mother’s cousin.
Bill and George’s mates weren’t so lucky. Wilf Kenny lost an eye, probably from bomb shrapnel, at Dead Man’s Ridge and he was repatriated to Australia on 27th September 1915. George Hills, the son of Alfred and Rebecca Hills of Spring Grove, Crookwell, died at sea on 8th August 1915 of wounds he received at Dead Man’s Ridge. Pat Lenehan rose quickly to the rank of RSM (Regimental Sergeant-Major) in the 1st Light Horse Regiment but he was killed in action at Beersheba on 31st October 1917, during the last great cavalry charge in history.